

How To Make Rounded Edges On Wood
[su_frame grade="responsive-image"]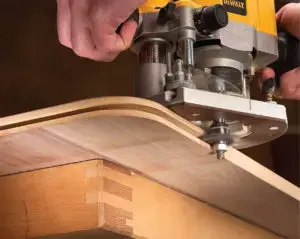 [/su_frame]
Are you lot seeking ways to round forest edges? Several woodwork aficionados take different approaches to rounding edges. Generally, this process tin be tricky especially when y'all aren't sure whether to utilize a router or not.
In this post, we describe the processes involved in turning sharp edges into round ones. Typically, rounding the edges of woodworks allows you to protect yourself, kids, pets, or other family members from accidents involving tables and chair legs.
Rounded wood edges also make painted surfaces more appealing when compared with abrupt edges. In fact, musical instruments such equally pianos and guitars have their solid and pleasant appearance thanks to the rounding of their edges.
Lastly, when you circular edges, you make the furniture durable and indestructible from likely falls or crashes.
Equally a woodworking enthusiast, you might be concerned virtually gathering expensive tools that you might not use oftentimes. Nonetheless, this mail service explains the possibility of routing forest edges or using culling tools to achieve woodwork rounding.
[annotation]Note that we take you first through the procedures of routing forest edges, and second, through the steps of rounding forest edges without a router.[/note]
Required Tools for this Project
Since the woodwork rounding project can be washed in two methods, the tools for each method vary. However, the overall aim of both patterns of rounding is to requite the wood a smooth, soft surface that causes no harm and absorbs paint nicely.
If you decide to become the traditional way, sandpaper would an option. Withal, the downside with this regular tool is the fact that it takes a lot of time and can be difficult in terms of consistency. While you lot might achieve smoothness on some edges, other corners might appear unlike.
Hence, if yous choose to round forest edges with a woods router, yous might want to choose one with variable-speed or the lock trigger functionality. Your choice router usually allows y'all to achieve your imagined/ideal results.
[su_spoiler championship="Additional tools you'll need when working with a router include:" open="yes" fashion="elementary" icon="plus" anchor="" class=""]
[su_list icon="icon: arrow-circle-right" icon_color="#4f8901″]
- Circular over cutter
- Chip material
- Safety glasses
- Ear protection (earplugs)
- Hot melt glue gum
- Sanding block
- Dust mask
[/su_list]
[/su_spoiler]
Notwithstanding, if you determine to round wood edges without a router, the most important tool is the mitt plane. From the jointer plane, smoothing plane, block plane to the jack plane, your choice of paw aeroplane should be closely linked to the woodwork projection you intend to work on.
In improver, the length of the handheld tool you select largely contributes to the success of your rounding project. Larger objects require jointer or smoothing planes whereas the jack and block planes are easier to use if you're working on smaller objects or you're using the tool for the first time.
[su_spoiler title="If you don't take a hand plane, you could try any of these alternatives:" open="yep" mode="simple" icon="plus" anchor="" class=""]
[su_list icon="icon: pointer-circumvolve-right" icon_color="#4f8901″]
- Cornering tools
- Card scrapper
- Chisel
- File
- Scratch stock
- Spokeshave
[/su_list]
[/su_spoiler]
How to Round Wood Edges With Router
[su_dropcap way="flat" size="2″ class="" dropcap_color="#fa5738″]1[/su_dropcap]
Route the ends earlier the sides
[su_divider elevation="no" manner="default" divider_color="#444″ size="three″ margin="15″ course=""]
[su_row class=""]
[su_column size="ane/2″ heart="no" grade=""]
When routing a board, begin with the ends before the sides to prevent splitting the already-routed sides. If you begin with the ends and move on to the sides, you could easily repair poor edges that might have occurred on the sides.
[/su_column]
[su_column size="1/two″ heart="no" course=""]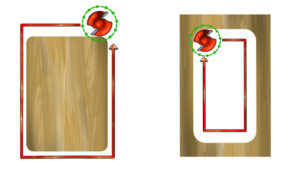 [/su_column]
[/su_row]
For inner edges of a wood piece, say a painting frame, motion your router in the clockwise direction. But for outside edges of a lath, for case, plow the router in counterclockwise motion for easy control.
[su_dropcap style="flat" size="ii″ class="" dropcap_color="#fa5738″]two[/su_dropcap]
Support Thin Woods Pieces with Scrap Materials
[su_divider meridian="no" manner="default" divider_color="#444″ size="three″ margin="15″ class=""]
[su_row grade=""]
[su_column size="1/2″ center="no" form=""]
When working with thinner boards, clamping the woods to your workbench might not exist a good idea. Routing could atomic number 82 to some form of damage to your workbench.
Instead, place a flake material that's relatively thicker than your strip behind or beneath the piece you lot're routing. Otherwise, consider sticking the scrap fabric and the actual wood piece you intend to route using hot-melt gum.
After the routing procedure, remove the gum using a putty knife.
[/su_column]
[su_column size="1/2″ heart="no" form=""]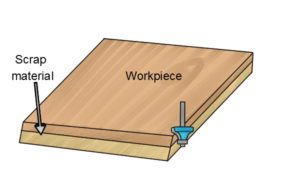 [/su_column]
[/su_row]
[su_dropcap mode="apartment" size="2″ class="" dropcap_color="#fa5738″]three[/su_dropcap]
Set Your Cutting Depth and Rout
[su_divider meridian="no" mode="default" divider_color="#444″ size="three″ margin="15″ form=""]
[su_row grade=""]
[su_column size="ane/2″ center="no" class=""]
Choose your preferred cutter and fit into the router's collet. Adjacent, place the router on the piece of woods and adjust the depth until you accomplish the ideal length. The router bit is the nearly of import part for routing edges but yous could make additional cuts by lowering or raising the bit.
[/su_column]
[su_column size="1/2″ heart="no" class=""]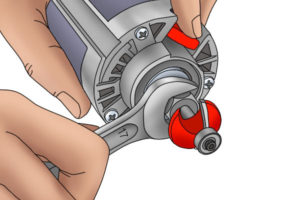 [/su_column]
[/su_row]
[su_dropcap manner="flat" size="2″ class="" dropcap_color="#fa5738″]4[/su_dropcap]
Inspect Your Rounded Workpiece
[su_divider top="no" style="default" divider_color="#444″ size="iii″ margin="15″ grade=""]
Afterward the routing, plough off your router and check your rounded edges. If you observe whatsoever areas y'all need to redo, feel free.
How to Round Woods Edges Without Router
[su_dropcap fashion="flat" size="2″ class="" dropcap_color="#fa5738″]ane[/su_dropcap]
Select the Best Hand Plane for Your Wood Project
[su_divider top="no" fashion="default" divider_color="#444″ size="3″ margin="fifteen″ class=""]
[su_row form=""]
[su_column size="one/2″ center="no" class=""]
Since unlike wood projects require different tools, information technology's essential that yous select the aeroplane that works best for you. Block planes are ideal for thin forest pieces while jack planes are perfect for both short and longboards.
Jointer planes are preferred for larger boards or frames such every bit doors whereas smoothing planes are used to level all sorts of surfaces.
[/su_column]
[su_column size="1/2″ middle="no" class=""]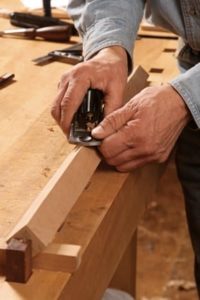 [/su_column]
[/su_row]
[su_dropcap style="apartment" size="2″ class="" dropcap_color="#fa5738″]2[/su_dropcap]
Plan Your Rounding with a Cutter with the Correct Radius
[su_divider height="no" style="default" divider_color="#444″ size="3″ margin="15″ class=""]
[su_row class=""]
[su_column size="1/2″ center="no" course=""]
If this is your start time rounding edges without a router, we recommend that y'all add around over cutter to your hand aeroplane. This helps you program for accuracy. Note that you lot can skip this layout planning when you become a pro.
[/su_column]
[su_column size="ane/2″ heart="no" form=""]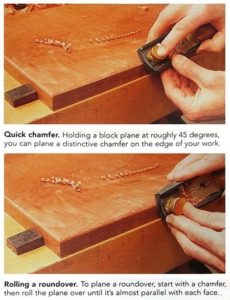 [/su_column]
[/su_row]
[su_row form=""]
[su_column size="1/2″ center="no" grade=""]
[su_dropcap manner="flat" size="2″ class="" dropcap_color="#fa5738″]3[/su_dropcap]
Cut Your Chamfer at 45-degrees
[su_divider top="no" style="default" divider_color="#444″ size="3″ margin="xv″ class=""]
Cutting a chamfer requires you to maintain a straight cut on your layout lines with a long plane. This move should requite you lot two corners.[/su_column]
[su_column size="1/ii″ eye="no" class=""]
[su_dropcap style="apartment" size="ii″ form="" dropcap_color="#fa5738″]4[/su_dropcap]
Plane Down Corners
[su_divider top="no" style="default" divider_color="#444″ size="3″ margin="15″ course=""]
To get your desired rounded edge, put your paw plane to each corner of the chamber until you have four corners.[/su_column]
[/su_row]
[su_dropcap style="flat" size="2″ grade="" dropcap_color="#fa5738″]5[/su_dropcap]
Finish
[su_divider top="no" style="default" divider_color="#444″ size="iii″ margin="15″ class=""]
Equally a last step, smooth the four corners so that they each have leveled surfaces or the desired rounded edges.
Overall, we hope that this post has successfully taught you how to round wood edges using a router or paw plane. What'southward your preferred rounding method?
Source: https://www.buildeazy.com/how-to-round-wood-edges/
0 Response to "How To Make Rounded Edges On Wood"
Post a Comment